Showing posts with label Christmas. Show all posts

Merry Christmas Lovelies!

I hope your day is full of time with loved ones and the peace of Christ!


Monday in Wonderland: Blessed

Happy Monday! Sorry this is super late—Christmas crafts are calling me!

Click to download

There something about this time of year that never fails to remind me just how blessed I am. I love being surrounded by family, hanging out with friends, and laughing all the way! The holidays are just simply magical and beautiful and full to the brim with love.

I encourage you to count your blessings this holiday season and never forget the reason we are all here—because of love and family! I as much as anyone tend to forget this simple truth and get caught up in finding/making the perfect gift for all those I love and whether I'm spending enough time and money on people! But as my parents pointed out recently, the most fun I have had recently is hanging ornaments on the tree, blasting Christmas music, and eating all the M&M’s (as our family tradition goes)! It really is the little things, isn’t it?

I pray that your Christmas is truly blessed, and that you take a minute along with me to see those blessings in your life. Because cheesy as it sounds, the best gifts have absolutely no monetary value at all! Merry Christmas, babes!

Stay lovely,

More DIY Ornaments!


Hello once again, my friends! Today I thought I’d share a collection of a few more very simple and inexpensive ornament ideas that are currently in use on our tree. It’s not necessarily anything super fancy or original, but simple things that you can make inexpensively and that still look really cute! I am loving the way our tree is coming together so simply, whimsically and somehow gracefully! Also, there is nothing breakable up there yet! So for cats, dogs, small children and klutzy adults, these ornaments are totally safe! (I’m… dreaming… of a non-flammable and non-threatening Christmas... Catchy new song in my opinion.)

Jingle bells

Large jingle bells of your desired color scheme (so gold for us—duh!) and coordinating ribbon will quickly have you jingling to a visibly decorated tree!


Origami ornament friends!

We found some GORGEOUS gold-foiled Christmas scrapbook paper and had to use it. And from there, YouTube and Pinterest supplied all the origami tutorials you could ever need! I struggled through an elephant and Sammy made a T-Rex, then I gave up and made seven swans a-swimming with my middle-school origami expertise! And then stars and hearts and things :)

Simple is better for these, because scrapbook paper is heavier weight than origami paper, and therefore can start to tear if you get too complicated! If you want to avoid this though, you can also find Christmas patterned origami paper! Which would’ve been way way smarter—but not as sparkly!


Golden feathers

I didn’t get these up on the tree before taking photos, but I think they are both eccentric and adorable! I added 2 coats of liquid leaf* to stiff craft feathers and a sprinkle of fine gold glitter on top. Insert the stems of the feathers into a Styrofoam block to dry. Then thread a needle, stitch through the stem of the feather, and knot it off into a loop!

*This product has heavy fumes and requires paint thinner to get off your brushes, so you may want to opt for gold acrylic or spray paint instead!


Gilded baking soda ornaments

Just use this recipe, cookie cutters, random textured objects, and a little gold acrylic paint to highlight your textures! You can also sprinkle glitter on the ornaments before they dry or use Mod Podge to add glitter afterward! Super cute, fun, and easy!


Everything else you see was either included with our $20 Craigslist Christmas tree, or purchased at Hobby Lobby when it was half off. Well except for the water color paper ornaments and flower garland!

Homemade ornaments really do warm my heart, and adding a few to our tree brought some bittersweet nostalgia for sure. How’s your holiday decorating coming along?

Stay lovely,

DIY Christmas Flower Garland


I gotta say, although my childhood home is nice and my future dream house is tempting, the little place I share with my sister at the moment certainly has its perks. For starters, I have a live-in editor and sometimes photographer, and can eat way too much mac and cheese and drink my weight in chocolate milk. And whether it’s my pink bedroom or the bright, mint green kitchen and metallic artwork in the living room, this college residence can be as obnoxiously girly as we want to make it! And so I kind of ran with that this year, and decided that our sweet little Christmas tree definitely needed some flower garlands!

And yes, I know you can just buy flower garlands, but I wanted the blossoms closer than they come on any store bought piece I could locate, and my lighted fall floral garland wasn’t going to fit that bill either. Plus, stringing all these white flowers was kind of my nod to the classic popcorn garlands, which I have never been lucky to spend hours constructing! 


You will need:

Small white faux flowers (I used various bunches and flowers off of less superior store-bought garlands :P)
Little green leaves, also fake (And again, from bouquets or garlands)
Dark green string
Large needle
Scissors


Remove the flowers and leaves from the bunch or garland by gently pulling them off the stem. You may need to cut them depending on the flowers you buy. Then, if you used a couple different bunches, divide them into type and count how many of each blossom you have so you can establish some kind of pattern as you string them on. You can see this alternation in the strand depicted above. (I am a little bit of a crafting control freak, I know.)

Then just string them on as you would popcorn on a garland, alternating buds with leaves folded in half as shown. How you do this will depend on the flowers you purchased. Some of mine were strung on through the plastic piece at the bottom of the flower bud, while others I just went through the petals near the base.

Tie knots on the ends of the garland if desired, and leave a tail on each end. I used this extra string at the ends to loop around branches on the tree and secure the garland in place.

Click here for the DIY Watercolor Paper Ornaments


I know this project looks a little time consuming, but it actually went very quickly for me and was a great way to stay creative while studying for finals! Ok, and watching Parks and Recreation. (I recently got so hooked on the show!) However, this would also be fun to do with some food, friends, and holiday music in the background!! And if you could swing it for fresh flowers—oh my goodness that would be just lovely! I digress.

I actually used three shorter garland pieces instead of one long one that would wrap all the way around the tree. Because our tree is pushed into a corner where no one can see the back, this saved me time, money, and the excitement of being a contortionist trying to get behind the tree to string up flowers! If you are feelin’ it though, why not make a super long string of wintery flowers?!

What quirky ways have you embellished your tree this year? I don’t think that this tree would mind a few more embellishments of that sort!

Stay lovely,

My Christmas Gift to You (and a DIY too!)


Christmas is almost here!!! I am so so so excited! And in honor of that excitement and the Christmas magic and Jesus (for reals though), my Monday in Wonderland this week isn’t the usual doodle and rant. In fact, all I promised you on Mondays was some doodling and typing and both those things are here, right now.

My little, early Christmas gift to you is some fun, free downloadables to make gift tags and cards! It really is as easy as print on cardstock and cut out, thanks to my tech-savvy sister!

Then again, could I really make things that easy? The downloads are just black and white, and I like to throw the kitchen sink at my crafts around here (definitely an expression, not literally…), so I also included a couple fun ways to embellish said gift tags and cards! Really, this is like a collaboration between me and any of you lovely souls who want to use my doodles to dress up your gifts!


Watercolor (because, watercolor!!)

I have been obsessed with watercoloring things since I made some watercolor paper Christmas ornaments a couple weeks ago. (My last Monday in Wonderland actually had watercolor also.) So these gift tags got a fun treatment too! To make sure the colors blend together well, you will need to add water to all the wells of color you want to use before starting. Then work really fast and with lots of water! It’s also helpful to kind of wash your lightest shade over the whole thing as the last step! A little messy, but so pretty!


A Touch of Gold (this shouldn’t even kind of surprise you by now)

All I used for these was an extra-fine tip sharpie oil based paint marker in gold. Because even though I am proud of my little drawings, I think a little metallic embellishment makes them even better!


And finally, after all my rambling, here are the actual links to download!


I hope y'all enjoy my little holiday gift to you guys! Have the merriest and brightest next few weeks!

Stay lovely,

PS: If you use these guys, tag me in a pic! It would make my heart so happy!


15 Fun Gift Ideas Under $15


Hey guys! It seems like most of my holiday get-togethers this time of year involve some sort of gift swap! It’s an easy way for everyone to get a little something without everyone spending a fortune, and can be pretty dang entertaining. And while gag gifts can be super hilarious, I’m the "lame" kid who usually puts something good in. (If anything, my presents tend to be a little whimsical rather than totally silly or cheap!) And I really enjoy these “good gifts” because I just love shopping for them! I also have a fun time picking up cute little things for my friends this time a year! (Or expressing my love with literally all the cookies.)

So in case you need an idea for a cute, small gift that’s maybe just a little on the quirky side, here are some gifts I’ve been giving, receiving, or desiring!


1. A classy cosmetic pouch, and sweet smelling lotion and soap! Or crazy nail polish or sparkly eyeliners or luxurious lipstick (red obviously)—oh my!

2. Jenga and a chocolate bar (everyone loves a usable gender neutral gift!)

3. A Ninjabread cookie making kit and perhaps extra gingerbread cookie mix


4. A chocolate milk kit: patterned straws, a bottle of chocolate syrup, and a cute glass! (I thrifted mine for $1!)

5. Cookies for Santa kit: A cute plate (you could easily DIY your own), sugar cookie mix, and a cute cookie cutter!

6. A mini Christmas tree with unconventional ornaments


7. Nerf guns! (Or a cheaper knock-off version. Because seriously, what children, or childish adults, don’t love shooting each other with foam bullets?)

8. A dorm-room photo kit: cute washi tape, colorful push pins, and an inexpensive picture frame (Maybe even a printed photo or two if it’s for a particular friend!)

9. Adult coloring book and colored pencils (I NEED this Alisa Burke coloring book in my life.)


10. 1. Torani holiday syrups sampler and a festive mug

11. For your single friends: “The Perfect Man” cookie cutter and ice cube tray (A perfect man frozen in time?! My bae, Steve Rogers?!)

12. Letter writing kit: Colorful pens, cards and envelopes, and maybe even a few stamps! And a request that they write to you first.

13. Fun food socks and a corresponding gift card! So for donut socks, throw in a Dunkin’ card! (Target and Forever 21 are great places to get these cheap. Also, I really want a donut now…)

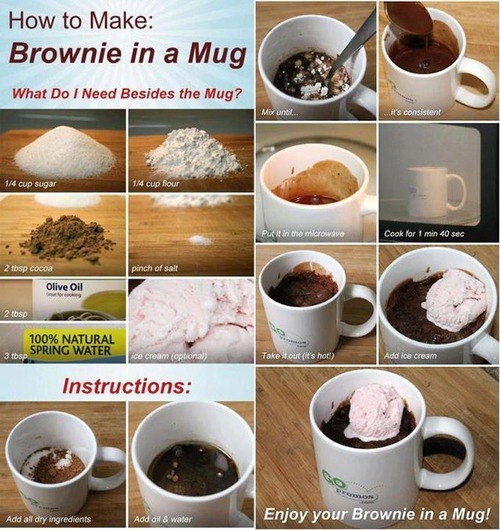
14. Brownie in a mug kit: a few baggies with brownie in a mug mix, a tablespoon, a small bottle of canola oil, written instructions, and a mug of course!

15. A DIY ugly sweater kit: include a basic sweatshirt ($3-5) or thrifted sweater, a mini hot glue gun ($3-6), some felt, a bit of tinsel, pompoms, or whatever other crazy supplies you want to throw in!

What are some go-to gifts you fall back on for friends and get-togethers?

DIY Watercolor Paper Ornaments

At home, it was always a tradition to decorate the tree while eating M&Ms and listening to Christmas music. And with tons of ornaments gathered over the years, it usually took a few hours! From gifted ornaments to first Christmas teddy bears, and the precious little homemade trinkets my parents got far too many of, there was seldom empty space on our Christmas tree. There were popsicle stick reindeer, and rice wreaths, and handprints galore!  And NOW, since me and my roommate/sister have our own tree (snagged on Craigslist for quite a discount by the way), the ornament making has commenced once again! As cheaply and simply as possible…

This first DIY is pretty basic, but could be adapted in so many ways! I think it would be totally great for kids too, because they probably have just about as much fun experimenting as I do! There are a few fun techniques we used, but you could do anything you’d like!

You will need:
Watercolor paper (we used this 9 x 12, 140 lb weight Canson brand)
Watercolor paints
Paintbrushes
A ruler
A circular object roughly 2.5-3” in diameter
Gold curling ribbon and scissors
Creativity and whatever other supplies your heart desires! (Our additional supplies were gold acrylic paint and cookie cutters.)


The basic process:
Measure and divide your watercolor paper into twelve 3” squares, paint the paper, trace your circles on the back, and cut out the circles. Punch a hole near the top. Fold a 7” piece of ribbon in half, and feed through the hole. Then feed the loose ends of the ribbon through the loop created by the fold, to make a somewhat flat knot resembling an ornament hanger. Tie another basic knot at the top of the ribbon so that your ornament can be hung from the tree! If your ribbon is only shiny on one side, follow the pictures above to keep the shiny side facing outward.

Now here are a few painting techniques we used:


Pick 4 simple patterns, and using a very small brush, paint each in 3 different shades, as shown above. This is obviously up to your discretion, but I really loved the cohesion continuing patterns and colors brought to our little tree!


Create an ombre wash by using more saturated paint at the bottom, and adding water as you move upward. This may take a little practice but never fear, you can always go solid or embrace the messy. I used the same technique of the three different colors, because I wasn’t sure I could extend the ombre across the width of the page! Then add patterns similar to those above with gold acrylic paint or liquid leaf! (The patterns also hide the fact that my ombre is pretty subpar ha!)


Or experiment with other gradients by mixing paint colors! This is actually way easier than the ombre and almost always comes out really pretty!


Last but not least, we used the initial painting techniques then cut out different fun Christmas shapes! Make sure the size of you initial squares (and therefore areas of pattern) are still big enough, paint, then trace your shapes on the back using Christmas cookie cutters! Cut from the paper, punch, and tie in the original manner!


As you can see, these ornaments come out a little crafty and definitely homemade, but they totally work for our simple, whimsical, and surprisingly coordinated approach to our tree! Plus talk about an inexpensive project and easy storage! (I’d rather spend my money on all the cute gifts I plan on making my sisters!) If you try this DIY out, tag me on Instagram or leave a link so I can see what painting techniques you experimented with! :D

What traditions do you have for decorating the tree?

Stay lovely,

Monday in Wonderland: December To Do List

Download here

Hellooooooo! Happy Monday!

So I try to keep these Monday in Wonderlands somewhat relatable to the general population, but let’s face it: I am a college student and the central conflict in my life right now is a handful of hard tests. Actually, I feel like high schoolers and even middle schoolers from my hometown are feeling the pressure of finals too. And even if you’re past those “hectic years” (yeah, I know, adulting is way harder) then maybe replace “finals” with “Christmas shopping,” “a visit from the in-laws,” or “white elephant gift exchanges.” (Obviously the bootie-kicking you need to do regarding gift swaps involves getting the most random, awesome gift out there.)

However you spin it though, December has the potential to be simultaneously the most stressful and most wonderful time of the year. (See what I did there?) And with the month starting tomorrow (crazy, right?!) this year I’m hoping to fight this stress with the Christmas spirit! At the end of the day, the holidays are supposed to be a lovely and relaxing time, no matter what Grinch-y professors or TV ads tell you. So here’s to a magical month full of cheer!
Now if you’ll excuse me, I have a few things on my to-do list to attend to. I’m thinking that numbers 1-3 look pretty appealing at this moment. (Or any moment of December really.)

Stay lovely,