

While window shopping in Estes Park this summer, me and
my older sister (read: design and fashion consultant) stumbled into the most
darling store with all manner of décor for kitchens, bedrooms, and your home
office. Now although basically everything in the store was out of reach of our
“broke college student” budget, we gathered all kinds of inspiration to create
some décor for ourselves. One such item that I longed to put my own twist on
was a set of darling cloud corkboards similar to these!
I do love whimsical little clouds, but I wanted to find a way to get just any
shape I wanted! The result was the cute cats above, which I procured for my
darling younger sister, and a set of quirky bows, which you will see in the
process pictures below.
Just as a disclaimer, cork is kind of a pain to work with,
but I discovered a lovely little trick to handle it with this
tutorial. So we got this guys! Let’s make a plethora of cute objects to pin our
memos to!

You will need:
Roll or sheet of 3/32” thick cork
Sheet of 5 mm thick craft foam (AKA “Fun Foam” knockoffs,
the thickest you can find!)
Permanent marker (not water based)
Pot of boiling water
Scissors
Hot glue
Acrylic paint and/or other embellishments!

Step 1
Fill a small pot with water and get it going with your
burner on high. (I know you probably understand this, but just in case.)
Step 2
In the meantime, print or draw a cute, simple silhouette
onto cardstock and cut out to create a stencil. Now I know there are a million
different cute things out there that you could make, but there is boiling water
on the stove, so you better choose quickly! (Or decide ahead of time, unlike me.)
Step 3
Put your stencil face down on the cork and trace your shape using a permanent marker. Cut a
chunk of the cork off the roll with a generous border around your shape so that
you have less to fuss with. You may notice the edges of the cork crumbling when
you cut a smaller piece of cork off the roll—don’t worry about this yet!

Step 4
I hope your water’s boiling now! Hold your piece of cork
over the steam to soften it. I steamed it for about 2 minutes, flipping it over
every 30 seconds so both sides got good and steamy. This will prevent the edges
of the cork from crumbling as much when you cut it, but please watch your
fingers or use tongs—that steam is hot! (While this step didn’t seem completely
necessary, I think it’s one of those things that requires little effort for a
little more finesse. Since my cork was in a roll, this also helped the piece
soften so it could lie flat.)
Step 5
Cut out the shape while the cork is still warm and
pliable. If you chose a larger or more detailed shape, you may have to place
your cork over the steam again to avoid crumbling. My shape was about the size of
a piece of computer paper and I steamed and cut it in 3 sections, but only for
about a minute on the later steamings.

Step 6
Using the same stencil as before, cut out the same shape
from your craft foam, this time cutting inside the lines so that the foam piece
is slightly smaller than the cork one. This will serve as a stabilizing backing
for your corkboard. It will also help prevent you from putting a bunch of holes
in your wall—always a plus!
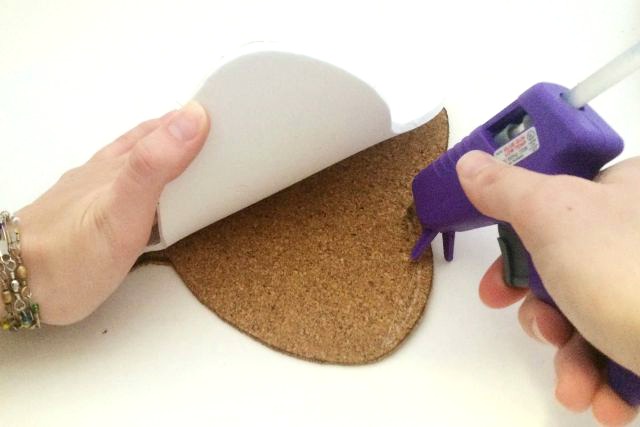
Step 7
Place your cork on top of your craft foam with the side
you traced on towards the foam (just in case any marks were left behind). Check
for fit, and cut the foam smaller if necessary. Then, using hot glue, adhere
the foam backing to your cork shape. I started at the right edge and moved
across in very small sections to avoid bumps. If you use this technique, try to
bend only your craft foam so you
don’t crack the cork.

Step 8
Paint your cork shape to your heart’s content! I love the
natural look of cork, so I kept my embellishment pretty simple, but you could
go as crazy as you’d like! You could even use fabric, cute buttons,
scrapbooking supplies, or photos to personalize little corkboards for your
space! I also found that adding a border to my shape and painting the edges of
the cork and foam this same color gave the board a cleaner look overall and hid
the foam better!
From there, all that’s left is to hang your adorable new
corkboard! I used Command strips for easy removal.


I would like to warn y’all though that with just the
layer of cork and fun foam, an average pushpin barely pokes through the back of
your board. Because I hung with Command strips, the board far enough for the
wall that this wasn’t a problem. However, if you are concerned, just add
another layer of foam.
As you can see, just about any simple shape will make the
cut for these guys! (Pun maybe intended?) Now whether or not I actually cover
wall décor this darling in a hundred memos is yet to be seen, but at least it
looks functional, right?
I’d love to see what you guys make with this tutorial or if
you have any other fun ways to use cork!
Stay lovely,

I was in Estes Park this summer, too! These cork boards are so cute. I might have to try this out soon!
ReplyDelete- Courtney
courtneylthings.blogspot.com
Isn't Estes Park so beautiful?!
DeleteAnd thank you so much. Make sure to let me know if you try it! :)